Depth of Field: Creating Shallow or Deep Focus
Depth of field (DoF) is a crucial photographic technique influencing the sharpness and clarity of an image. Mastering DoF allows photographers to control which parts of the scene are in focus, creating artistic effects and drawing the viewer's eye to specific elements. This guide explores the intricacies of shallow and deep focus, offering practical tips, real-world examples, and product recommendations to elevate your photography. By understanding aperture, focal length, and sensor size, you can unlock the full potential of depth of field and create stunning, impactful images.
So, you want to understand depth of field? Awesome! It's one of those things that, once you get it, totally transforms your photography. We're talking about that blurry background, that sharp subject, that dreamy look – all depth of field. Let's break it down, get practical, and even talk about some cool gear.
Understanding Depth of Field What is Depth of Field in Photography
Okay, let's start with the basics. Depth of field refers to the area in your image that appears acceptably sharp. It’s not just one point; it's a range. A shallow depth of field means only a small portion of your image is in focus, usually your subject. A deep depth of field means a large portion, or even the entire scene, is sharp. Think portraits with blurred backgrounds versus landscapes where everything is crisp.
Factors Affecting Depth of Field Aperture Focal Length and Sensor Size Explained
Three main things control your depth of field:
- Aperture: This is the size of the opening in your lens. It's measured in f-stops (like f/1.8, f/2.8, f/8, f/16). A wider aperture (smaller f-stop number, like f/1.8) creates a shallower depth of field. A narrower aperture (larger f-stop number, like f/16) creates a deeper depth of field. Think of it like this: a wider aperture lets in more light, but also blurs more of the background.
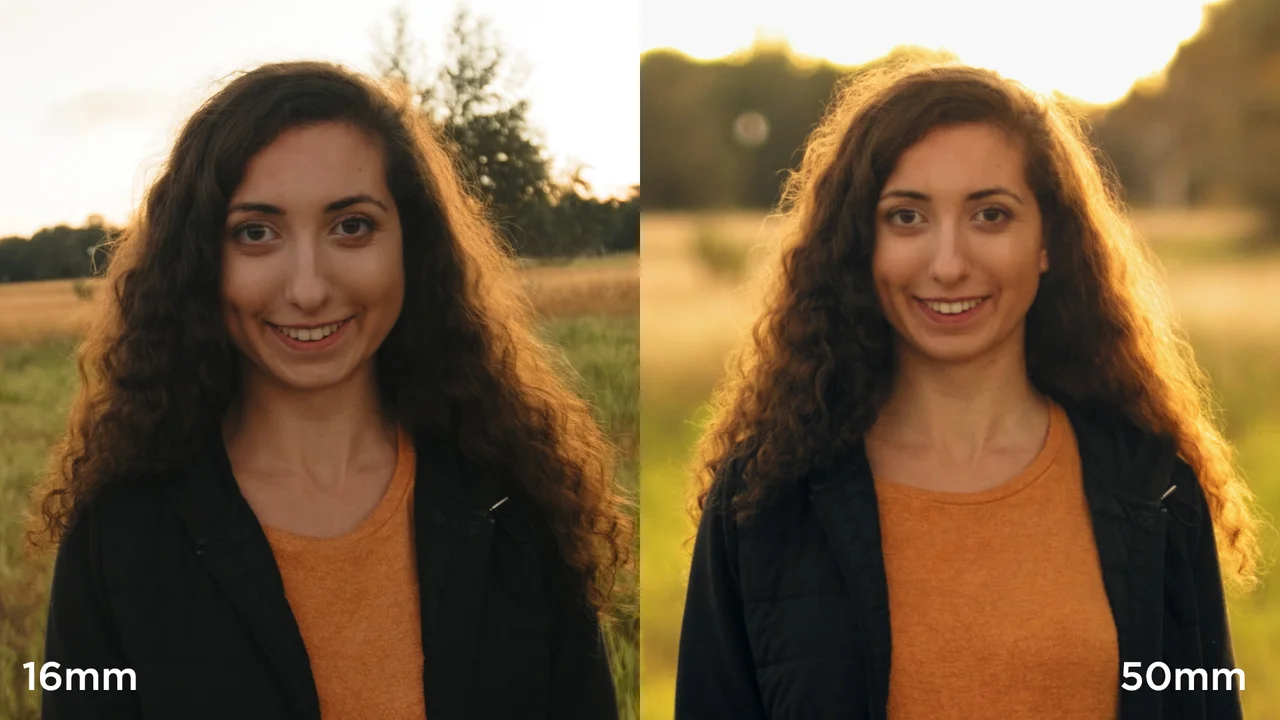
- Focal Length: This is the distance between the lens and the image sensor. Longer focal lengths (like 200mm) produce shallower depths of field compared to shorter focal lengths (like 24mm) at the same aperture. That's why telephoto lenses are great for isolating subjects.
- Sensor Size: This is the size of the image sensor in your camera. Larger sensors (like full-frame) produce shallower depths of field than smaller sensors (like APS-C or micro four-thirds) at the same aperture and focal length. This is because a larger sensor needs to be closer to the lens to achieve the same field of view, effectively magnifying the effect of the aperture.
Shallow Depth of Field Techniques Creating Bokeh and Isolating Subjects
Shallow depth of field is your friend when you want to isolate your subject. It's perfect for portraits, macro photography, and any situation where you want to draw attention to a specific point. The out-of-focus areas, often referred to as bokeh, can be incredibly pleasing and add a dreamy quality to your images.
How to achieve it:
- Use a wide aperture (e.g., f/1.4, f/2.8).
- Use a longer focal length lens (e.g., 85mm, 135mm).
- Get closer to your subject.
Example: Imagine photographing a flower in a field. Using a wide aperture like f/2.8 and an 85mm lens will blur the background, making the flower pop. You'll get that creamy, out-of-focus background (bokeh) that everyone loves.
Deep Depth of Field Techniques Landscapes and Sharp Focus
Deep depth of field is essential for landscapes, architectural photography, and situations where you want everything in focus. It ensures that the entire scene, from foreground to background, is sharp and clear.
How to achieve it:
- Use a narrow aperture (e.g., f/8, f/11, f/16).
- Use a shorter focal length lens (e.g., 24mm, 35mm).
- Focus at the hyperfocal distance (more on that later).
Example: Think about capturing a stunning mountain range. Using a narrow aperture like f/11 and a wide-angle lens like 24mm will ensure that the foreground rocks, the distant mountains, and everything in between are sharp.
Practical Applications Portraits Landscapes and Macro Photography
Let's look at how depth of field is used in different genres:
- Portraits: Shallow depth of field is key. It separates the subject from the background, creating a flattering and professional look. Focus on the eyes for the most impact.
- Landscapes: Deep depth of field is usually the goal. Use a narrow aperture to get everything sharp. Consider using focus stacking if you need even more sharpness.
- Macro Photography: Depth of field is incredibly shallow in macro. Often, only a tiny portion of your subject will be in focus. Focus stacking is often used to extend the depth of field in macro shots. Experiment with different apertures to see what works best for your subject.
Hyperfocal Distance Explained Maximizing Sharpness in Landscapes
The hyperfocal distance is the distance at which, when you focus, everything from half that distance to infinity will be acceptably sharp. It's a crucial concept for landscape photographers who want to maximize sharpness. There are hyperfocal distance calculators available online or as apps. Input your focal length and aperture, and it will tell you where to focus.
How to use it:
- Determine the hyperfocal distance for your lens and aperture.
- Focus on a point at that distance.
- Everything from half that distance to infinity should be sharp.
Gear Recommendations Lenses for Shallow and Deep Depth of Field
Alright, let's talk gear! Here are a few lenses that are great for controlling depth of field:
- For Shallow Depth of Field (Portraits, etc.):
- Sony FE 50mm f/1.8: A budget-friendly option that's incredibly sharp and produces beautiful bokeh. Great for portraits and general photography. Price: ~$250. Use it for portraits, street photography, and even some product shots.
- Canon EF 85mm f/1.8 USM: A classic portrait lens that's known for its sharpness and pleasing bokeh. Price: ~$400. Perfect for headshots, full-body portraits, and events.
- Nikon AF-S NIKKOR 35mm f/1.8G ED: A versatile lens that's great for street photography, portraits, and general use. Provides a good balance between sharpness and bokeh. Price: ~$200. Use this for environmental portraits, street scenes, and casual photography.
- For Deep Depth of Field (Landscapes, etc.):
- Sigma 16mm f/1.4 DC DN Contemporary (for Sony E-mount or Micro Four Thirds): A wide-angle lens that's perfect for landscapes and astrophotography. It's sharp and relatively affordable. Price: ~$400. Ideal for capturing expansive landscapes, cityscapes, and the night sky.
- Fujifilm XF 10-24mm f/4 R OIS: A versatile zoom lens that's great for landscapes, architecture, and travel photography. It's sharp and has image stabilization. Price: ~$900. Use it for landscapes, architectural shots, and travel photography where versatility is key.
- Panasonic Lumix G Vario 7-14mm f/4 ASPH (for Micro Four Thirds): An ultra-wide-angle lens that's perfect for capturing expansive scenes. It's sharp and relatively compact. Price: ~$900. Great for landscape, architectural, and interior photography.
Product Comparison Considerations for Different Budgets
Choosing the right lens depends on your budget and needs. Here's a quick comparison:
- Budget-Friendly Options (Under $500): The 50mm f/1.8 lenses from Canon, Nikon, and Sony are excellent choices for beginners. They offer great image quality and are relatively affordable. The Sigma 16mm f/1.4 is also a good option for wide-angle shots, especially for Sony and Micro Four Thirds users.
- Mid-Range Options ($500 - $1000): The 85mm f/1.8 lenses from Canon and Nikon offer excellent portrait performance. The Fujifilm 10-24mm f/4 is a versatile zoom lens that's great for landscapes and travel.
- High-End Options (Over $1000): Consider lenses with wider apertures (e.g., f/1.4) or more specialized features (e.g., image stabilization) for even better performance. These are often zoom lenses with wider ranges or prime lenses with exceptional sharpness.
Real-World Examples Depth of Field in Action
Let's look at some real-world examples:
- Portrait: A photographer uses an 85mm lens at f/2.8 to capture a portrait. The subject's eyes are sharp, while the background is blurred, creating a pleasing and professional look.
- Landscape: A photographer uses a 24mm lens at f/11 and focuses at the hyperfocal distance to capture a landscape. Everything from the foreground rocks to the distant mountains is sharp.
- Macro: A photographer uses a macro lens at f/5.6 to capture a close-up of a flower. Only a tiny portion of the flower is in focus, creating a dreamy and artistic look.
Common Mistakes to Avoid Focusing Errors and Aperture Selection
Here are some common mistakes to avoid:
- Incorrect Focus: Always make sure you're focusing on the correct point. For portraits, focus on the eyes. For landscapes, consider using the hyperfocal distance.
- Using the Wrong Aperture: Choose the aperture that's appropriate for your subject and desired depth of field. A wide aperture will create a shallow depth of field, while a narrow aperture will create a deep depth of field.
- Ignoring Sensor Size: Remember that sensor size affects depth of field. A larger sensor will produce a shallower depth of field than a smaller sensor at the same aperture and focal length.
Experimenting with Depth of Field Practice and Creative Techniques
The best way to master depth of field is to practice! Experiment with different apertures, focal lengths, and sensor sizes to see how they affect your images. Try different creative techniques, such as using depth of field to create a sense of depth or to isolate your subject. Don't be afraid to experiment and have fun!
So, there you have it! A comprehensive guide to depth of field. Go out there and start experimenting. You'll be amazed at the difference it makes in your photography.
:max_bytes(150000):strip_icc()/277019-baked-pork-chops-with-cream-of-mushroom-soup-DDMFS-beauty-4x3-BG-7505-5762b731cf30447d9cbbbbbf387beafa.jpg)